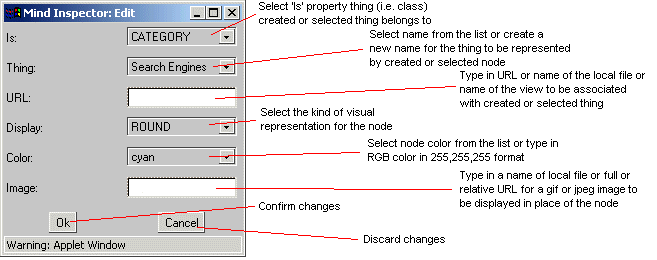
Mind Inspector Dialog
Using this dialog, you are able to change visual properties of any Node and create new Things without of using
console. There are two situations when you get here.
First is when you click in empty space within a View. In this case, you will see "Mind Inspector: New" at the title of the dialog window. That means, you are prompted to create new Node along with New Thing. If you really want to create a new Thing with this Node, you use Is Choice of the dialog to select category thing (or class, or parent thing/class) of new thing you create. For example, if you already created Thing "Man" for the abstract man and you are going to create new Thing for real instance of man named by "Tom", you select "Man" using Is Choice. Then, you select … (thee dots) in the Thing Choice and you will be given a text field to enter the name of the Thing ("Tom" in our example).
If you want to create a new Node for existent Thing, you just select the name of the Thing from the Thing Choice list.
Second case to get into this dialog is double-click on existent Node. Then, you will be able to change properties of existent Node and even change reference to entire Thing being represented by this Node.
URL text field refers to URL Property of the Thing. When you fill this, you will become able to use any Node referring to this Thing as web hyperlink. There are three kids of "hyperlinks" you can use. First, you can enter complete name of any View in current World (then, you will be brought to given world any time you click on this Node in Click:Goto mode). Second, you can enter name of the text file with description of another world or URL of applet keeping another world (in this case, respective world will be loaded into your Applet or Application). Third, you can specify conventional URL of any web page (then, if you are running applet under the web browser, you will have your browser directed to load respective page).
Display Choice specifies the shape used to represent the node. If IMAGE is selected, you can use other Image field to put name of the image to load in this place.
Color Choice is used to select one of predefined colors. If you like none of them, select … (three dots) and you will be given a text field to enter color of your own choice. For example "255,0,0" wold be Red, "0,255,0" would be Green, "0,0,255" would be Blue and "128,128,128" would be Gray. Moreover, you can add transparency value to your color so it would look like "0,255,0,128" (unfortunately, you can not see transparent colors when running Applet in the browser).
Image text field lets you type in name of the image file you want to associate with the Node. You can use either local file name or web URL. Still, when you are running Applet which loads data not from Servlet but from text file on the web, you can not use local image files or URLs to images located on other servers (it is Ok to put ANY URLs when you are working with Applet connected to Servlet). For example, Webstructor Worlds on this site use images located
here.(C) Copyright 1988-1998,2001 Anton Kolonin